
Arduino Solar Tracker - خليه شمسية متحركة باستخدام الاردوينو
في أنظمة التعقب الشمسية الحديثة، يتم تثبيت الألواح الشمسية على هيكل يتحرك وفقا لموقف الشمس.
In modern solar tracking systems, the solar panels are fixed on a structure that moves according to the position of the sun.
Let us design a solar tracker using two servo motors, a light sensor consisting of four LDRs and Arduino UNO board.
يلا بينا نبدا العمل على تجهيز نوع جديد باستخدام مواتير سيرفو وخليه ضوئية واردوينو اونو
Circuit Diagram

The circuit design of solar tracker is simple but setting up the system must be done carefully.
Four LDRs and Four 100KΩ resistors are connected in a voltage divider fashion and the output is given to 4 Analog input pins of Arduino.
The PWM inputs of two servos are given from digital pins 9 and 10 of Arduino.
لنبدا بالعمل على دائرة بسيطة لنصمم نظام الخلايا الشمسية
نحضر عدد 4 خلية ضوئية 100 اوم وتوضع على الاطراف Anloge الاطراف التناظرية على الاردوينو
ونستخدم النقطتيين 9 و 10 للعمل على المواتير باستخدام نظام تغيير عرض النبضة
Working
LDRs are used as the main light sensors. Two servo motors are fixed to the structure that holds the solar panel. The program for Arduino is uploaded to the microcontroller. The working of the project is as follows.
LDRs sense the amount of sunlight falling on them. Four LDRs are divided into top, bottom, left and right.
For east – west tracking, the analog values from two top LDRs and two bottom LDRs are compared and if the top set of LDRs receive more light, the vertical servo will move in that direction.
If the bottom LDRs receive more light, the servo moves in that direction.
For angular deflection of the solar panel, the analog values from two left LDRs and two right LDRs are compared. If the left set of LDRs receive more light than the right set, the horizontal servo will move in that direction.
If the right set of LDRs receive more light, the servo moves in that direction.
العمل
وتستخدم لدرس كمستشعرات الضوء الرئيسية. يتم تثبيت اثنين من المحركات المؤازرة إلى الهيكل الذي يحمل الألواح الشمسية. يتم تحميل برنامج لاردوينو إلى متحكم. عمل المشروع هو كما يلي.
لدرس بمعنى كمية ضوء الشمس السقوط عليها. وتنقسم أربعة لدرس إلى أعلى وأسفل واليسار واليمين.
بالنسبة لتتبع الشرق والغرب، تتم مقارنة القيم التناظرية من اثنين من لدرس أعلى واثنين من لدرس أسفل وإذا مجموعة أعلى من لدرس تلقي المزيد من الضوء، وسوف تتحرك أجهزة العمودية في هذا الاتجاه.
إذا لدرس أسفل تلقي المزيد من الضوء، يتحرك المؤازرة في هذا الاتجاه.
وبلنسبة للانحراف الزاوي لللوحة الشمسية، تتم مقارنة القيم التناظرية من اثنين من لدرس اليسار واثنين من لدر الحق. إذا تلقت مجموعة اليسار من لدرس المزيد من الضوء من مجموعة الحق، فإن المؤازرة الأفقية تتحرك في هذا الاتجاه.
إذا تلقت مجموعة الحق من لدرس المزيد من الضوء، يتحرك المؤازرة في هذا الاتجاه.
خطوات العمل
Step-1
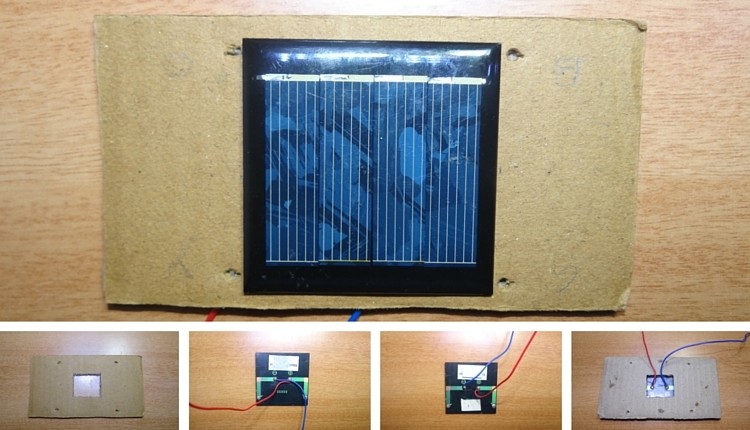
Take cardboard. Make a hole in the middle and four holes on four sides so that LDR fit into that.
Stick the solar panel to the cardboard and bring two wires of the panel out as shown.
الخطوة 1
خذ الكرتون. جعل ثقب في الوسط وأربعة ثقوب على أربعة جوانب بحيث لدر تناسب ذلك.
عصا الألواح الشمسية على الورق المقوى وجلب اثنين من الأسلاك خارج لوحة كما هو مبين.
Step 2
Now cut one of the two leads of the LDR so that one lead is shorter and other is longer.
Insert these four LDRs into four holes as shown.
Bend the straight Perforated metal strip as shown below.
Place the bent metal strip on the back side of the cardboard
Apply glue to the LDR to fix them firmly.
الخطوة 2
الآن قطع واحد من اثنين من يؤدي من لدر بحيث الرصاص واحد هو أقصر وغيرها هو أطول.
إدراج هذه لدرس أربعة إلى أربعة ثقوب كما هو مبين.
ثني الشريط المعدني مثقب على التوالي كما هو مبين أدناه.
وضع الشريط المعدني عازمة على الجانب الخلفي من الورق المقوى
تطبيق الغراء لدر لإصلاحها بحزم.

الخطوه 3
لحام اثنين من يؤدي من لدر كما هو مبين
إلى الطرف الآخر من لدر المقاومات اللحام من 10K أوم
الانضمام إلى أربعة يؤدي من 4 لدرس من خلال ربط مع سلك.
Step 3
Solder the two leads of LDR as shown
To the other ends of LDR Solder resistors of 10k ohm
Join the four leads of the 4 LDRs by connecting with a wire.

Step4
Now take a bus wire.This is used to connect the Outputs of four LDRs to Arduino board.
Insert it into metal strip as shown in the image.
Now Solder the four wires to four LDRs at any point between LDR and resistor.
الخطوة 4
الآن اتخاذ سلك bus.This يستخدم لتوصيل مخرجات أربعة لدرس إلى مجلس اردوينو.
أدخله في شريط معدني كما هو مبين في الصورة.
الآن لحام الأسلاك الأربعة إلى أربعة لدرس في أي نقطة بين لدر والمقاوم.

Step 5
Insert another two wire bus into the perforated metal strip as shown.This is used for supplying Vcc and GND to LDR circuit.
Solder one wire to the leads of LDRs which are connected to resistors and other wire to the other leads.
Short the leads of LDRs connected to resistors using a wire as shown.
الخطوة 5
إدراج آخر اثنين من الحافلات الأسلاك في قطاع معدنية مثقبة كما هو موضح.هذا يستخدم لتوريد فك و غند لدر الدائرة.
لحام سلك واحد إلى يؤدي لدرس التي ترتبط المقاومات وغيرها من الأسلاك إلى يؤدي الأخرى.
اختصار يؤدي لدرس متصلة المقاومات باستخدام سلك كما هو مبين.

Step 6
Now connect a servo motor to the Perforated metal strip using Screw.
Apply glue to the servo to fix it firmly.
.الخطوة 6
الآن ربط محرك سيرفو إلى قطاع معدنية مثقبة باستخدام المسمار.
تطبيق الغراء إلى أجهزة لإصلاحه بحزم.

Step 7
Take another straight Perforated metal strip and bend it as shown in the figure.
الخطوة 7
خذ شريط معدني مثقب مستقيم آخر وثنيه كما هو مبين في الشكل.

Step 8
Now place the set up of solar panel and first servo motor to the metal strip of second servo motor as shown.
الخطوة 8
الآن وضع مجموعة من الألواح الشمسية وأول أجهزة السيارات إلى الشريط المعدني من أجهزة السيارات الثانية كما هو مبين.

Project Code
كود المشروع
#include <Servo.h>
//defining Servos
Servo servohori;
int servoh = 0;
int servohLimitHigh = 160;
int servohLimitLow = 20;

Servo servoverti;
int servov = 0;
int servovLimitHigh = 160;
int servovLimitLow = 20;
//Assigning LDRs
int ldrtopl = 2; //top left LDR green
int ldrtopr = 1; //top right LDR yellow
int ldrbotl = 3; // bottom left LDR blue
int ldrbotr = 0; // bottom right LDR orange

 void setup ()
 {
  servohori.attach(10);
  servohori.write(0);
  servoverti.attach(9);
  servoverti.write(0);
  delay(500);
 }

void loop()
{
  servoh = servohori.read();
  servov = servoverti.read();
  //capturing analog values of each LDR
  int topl = analogRead(ldrtopl);
  int topr = analogRead(ldrtopr);
  int botl = analogRead(ldrbotl);
  int botr = analogRead(ldrbotr);
  // calculating average
  int avgtop = (topl + topr) / 2; //average of top LDRs
  int avgbot = (botl + botr) / 2; //average of bottom LDRs
  int avgleft = (topl + botl) / 2; //average of left LDRs
  int avgright = (topr + botr) / 2; //average of right LDRs

  if (avgtop < avgbot)
  {
    servoverti.write(servov +1);
    if (servov > servovLimitHigh)
     {
      servov = servovLimitHigh;
     }
    delay(10);
  }
  else if (avgbot < avgtop)
  {
    servoverti.write(servov -1);
    if (servov < servovLimitLow)
  {
    servov = servovLimitLow;
  }
    delay(10);
  }
  else
  {
    servoverti.write(servov);
  }

  if (avgleft > avgright)
  {
    servohori.write(servoh +1);
    if (servoh > servohLimitHigh)
    {
    servoh = servohLimitHigh;
    }
    delay(10);
  }
  else if (avgright > avgleft)
  {
    servohori.write(servoh -1);
    if (servoh < servohLimitLow)
     {
     servoh = servohLimitLow;
     }
    delay(10);
  }
  else
  {
    servohori.write(servoh);
  }
  delay(50);
}
ليست هناك تعليقات:
إرسال تعليق